
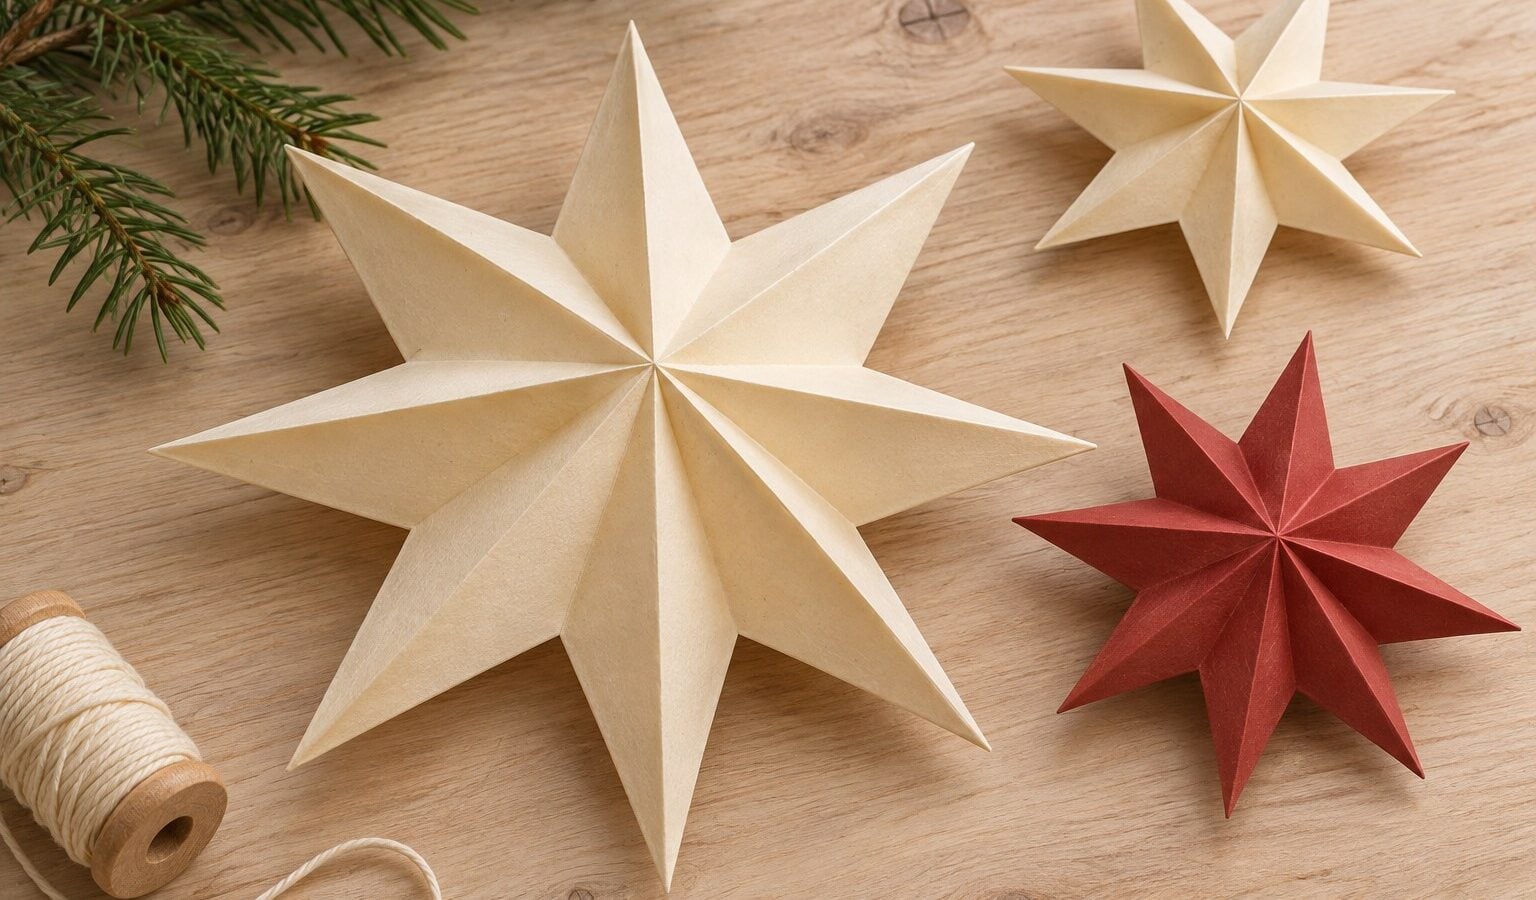
A few folded paper Christmas stars can turn a bare branch, a window, or a parcel into something festive. This eight-point design starts with two ordinary paper squares. Each square becomes a raised four-point half; joining the halves with their points alternating creates the finished decoration.
The free printable includes a 15 cm template, marked stopping points for the cuts, and illustrated folding instructions. Allow about 30 minutes for your first star, plus drying time. The cutting and overlapping steps are best done with adult help when children join in.
Download the free paper Christmas star template and folding guide (PDF). No sign-up is needed.
What You Need
- Two equal squares of flexible paper, 15 x 15 cm for the printable pattern
- Scissors, a ruler, and a pencil
- A glue stick or a small amount of quick-drying paper glue
- Cotton thread or narrow ribbon for hanging
- Optional: the printable template and a small piece of tape for securing the hanging loop
Ordinary colored paper or printer paper, around 80-120 gsm, is a useful starting point. Heavy card is harder to overlap neatly. If you use patterned paper, choose paper with a decorative front and a plain back so it is easy to keep track of the folds. Try one practice half with scrap paper before cutting a special sheet.
This tutorial makes a folded-and-glued eight-point star. Danish woven strip stars, often called Fröbel stars, use a different technique. For another project with a Danish connection, pair these stars with woven paper Christmas hearts.
Print and Prepare the Free Template
The PDF has three pages: one full-size cutting pattern and two pages of illustrated instructions. Print page 1 twice to make the two halves. The page layout works on US Letter or A4; select 100% or Actual size, center the page, and turn off Fit to page. The 5 cm check line should measure exactly 5 cm.
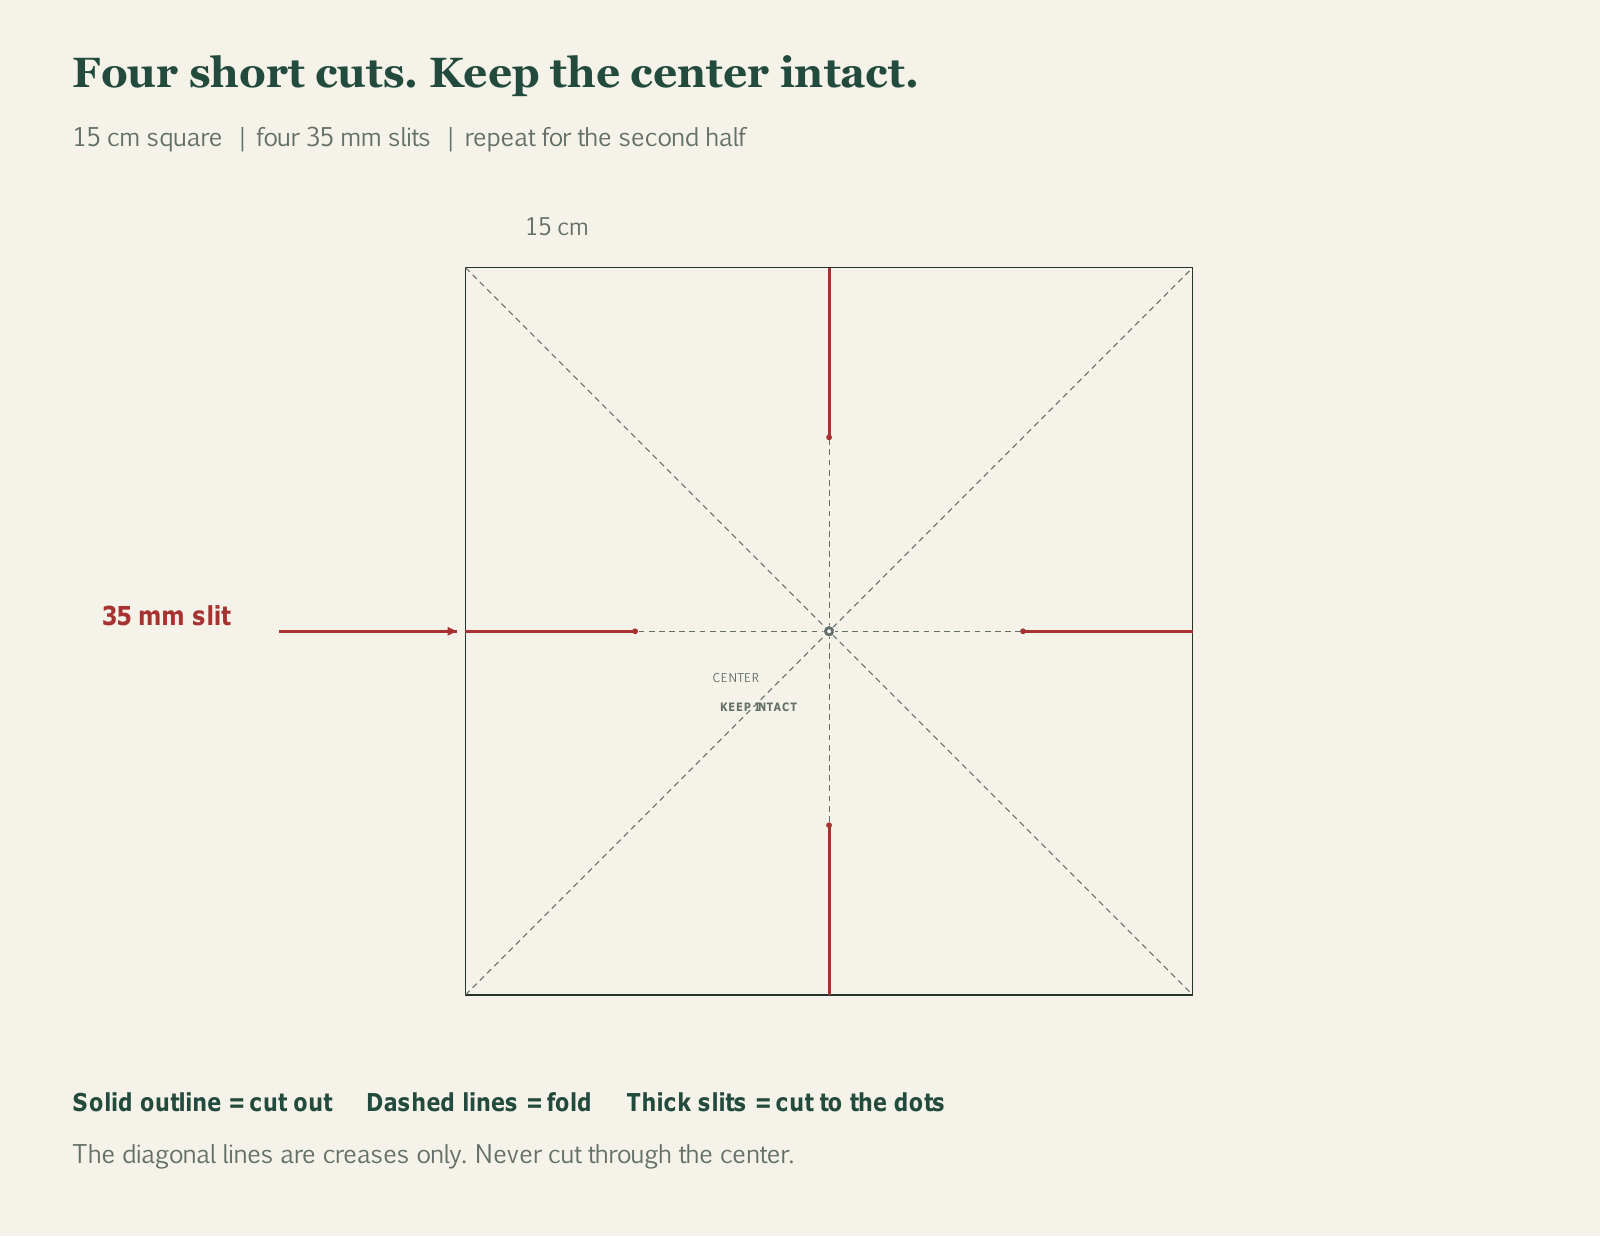
You can fold the printed squares directly, keeping the markings on the inside. To use decorative paper, cut out one printed square as a size guide and trace two matching squares. Mark a 35 mm stopping point on each of the four center creases before cutting. The colored lines remain distinguishable by their solid or dashed style if you print in black and white.
How to Make an Eight-Point Paper Christmas Star
1. Cut Two Matching Squares
Cut two squares measuring 15 x 15 cm. Check the corners with a ruler and keep the sides straight: mismatched squares make the final halves harder to line up. You can use two colors, although using the same paper for both halves gives a simple, even finish.
2. Make the Four Crease Lines
With the decorative side facing inward, fold one square in half from top to bottom, open it, then fold it in half from side to side and open again. Turn the square over. Fold corner to corner along one diagonal and unfold; repeat along the other diagonal. Open the square fully. You should see a horizontal crease, a vertical crease, and two diagonal creases meeting in the middle. Repeat with the second square.
3. Cut Four Short Slits
From the middle of each straight edge, cut 35 mm inward along the horizontal or vertical crease. Use the marked stopping points in the printable. Make four cuts in each square, all the same length. Do not cut the diagonal creases or continue to the center. The middle of the sheet must remain joined.
Without a printer, use the ruler to measure the 35 mm cuts yourself. For a different square size, make each slit a little shorter than one-quarter of the side length. That is a little less than halfway from the edge to the center, not halfway across the whole sheet.
4. Fold the Flaps Toward Each Diagonal
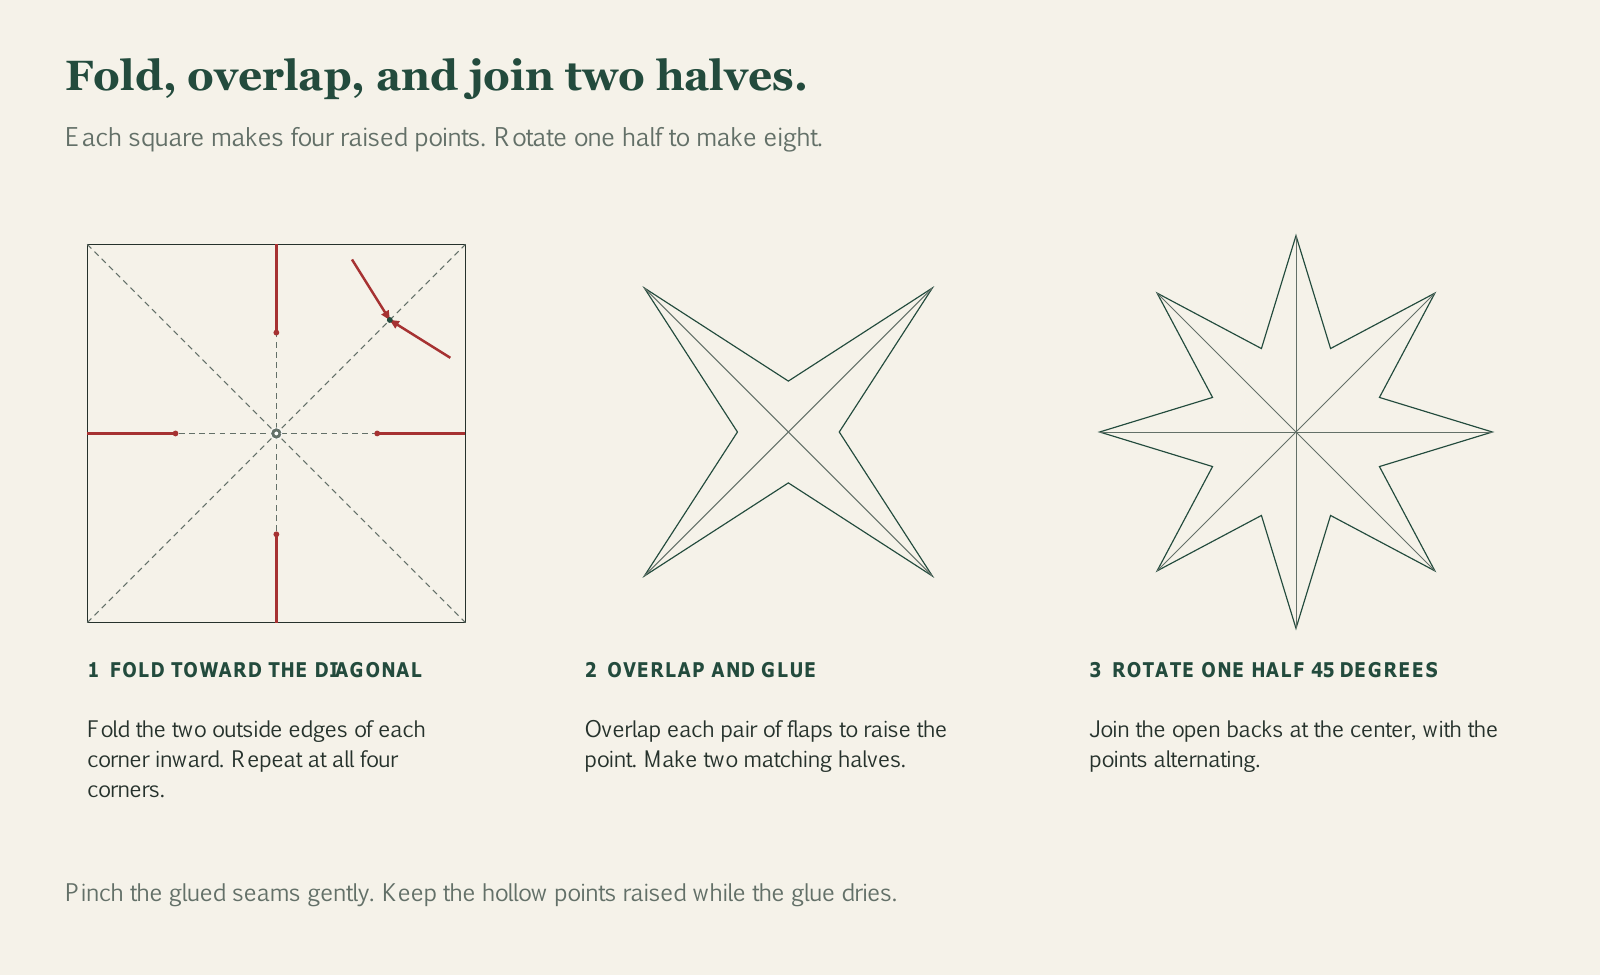
Work with the plain side facing you. Take one original corner of the square. Fold the two outside edges belonging to that corner inward until they meet the diagonal crease running from the corner toward the center. The cuts let these flaps move independently. Crease the folds neatly.
Repeat at the other three corners. Each corner now has a pair of folded flaps: eight flaps in total. Keep the original corners as the tips of your four points.
5. Overlap and Glue the Four Raised Points
At one point, spread a thin layer of glue on one folded flap. Bring its partner flap over it so the two overlap, lifting the paper into a small hollow point. Keep a finger underneath the point while you pinch the glued seam. Press the seam rather than flattening the whole point.
Glue the other three points in the same way. Set this four-point half aside to hold, then prepare the second square with the same cuts, folds, and amount of overlap. Use glue sparingly so the paper keeps its shape.
6. Join the Halves with the Points Alternating
Turn the halves so their open backs face each other. Rotate one half by 45 degrees, placing each of its points in a gap between the other half’s points. Check the arrangement before adding glue: you should be able to count eight outside points.
Add small dabs of paper glue where the central backs touch. Bring the halves together and hold gently until the join begins to set. Avoid pushing down on the tips. Leave the star undisturbed for the drying time given on your glue.
7. Add a Hanging Loop
For a concealed loop, trap both ends of a short length of thread at one of the central glued joins before it dries. Another option is to tape the ends securely to a seam on the back after the star is assembled. Test the attachment close to the table before hanging the star from a branch, in a window, or along a garland.
If Your Paper Star Will Not Hold Its Shape
The Points Look Flat
The paired flaps need to overlap to make each point rise. Simply gluing their edges side by side leaves a flat shape. Before the glue dries, ease one flap over the other while supporting the inside with a fingertip.
The Paper Tears Near a Slit
Do not pull the flaps into place by force. Check that all four slits are equal and reach the marked stops. A slit that is too short makes the paper resist the fold; a slit that runs too far toward the center weakens the join. Flexible paper and a thin layer of glue make the first attempt easier.
The Two Halves Do Not Sit Together
Check that they started as equal squares and that you used similar overlap on both halves. Let the points hold their shape before assembling the center. The backs need only touch at the central join; do not squeeze the whole star flat to make every surface meet.
The Glue Makes the Paper Wrinkle
Use less glue and hold the seam a little longer. A glue stick often suits light paper; a small amount of paper craft glue can help on a stubborn central join. Test the glue on a scrap of your chosen paper first.
Ways to Decorate with Your Finished Stars
- Hang cream and red stars at different heights from a Christmas branch.
- Make several smaller matching stars for a garland, keeping both squares in each star the same size.
- Rest one on a wrapped gift and attach it gently with thread rather than crushing it under ribbon.
- Use a star at each place setting with a small handwritten name tag beside it.
Keep paper decorations away from candles and hot bulbs. Store them in a roomy box with tissue between them so the raised points are not pressed flat.
For a longer craft afternoon, make Danish woven Christmas hearts alongside the stars, or set out the free Christmas trivia quiz while the glue dries. You can find more projects in Christmas activities and crafts.
Ready for your first star? Download the free paper Christmas star template and folding guide (PDF) and choose two matching paper squares.


 How to Make Danish Woven Christmas Hearts (Free Template)

